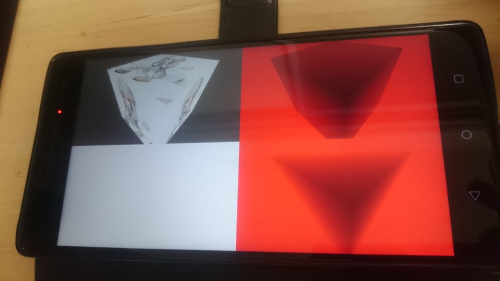
オブジェクトのエッジを強調したり、モデルベースの画像処理を行いたいときなどは、見ているシーンの深度画像が必要になります。(これは本当)
OpenCV に現在フレームの深度画像を渡したいときは float 配列としてカメラからのZ距離が得られると文句はないのです。
この記事ではその float 配列の取得方法を動作確認込みで示します。

Unity で深度画像を得る方法をいくつか存じておりますが、私が知る中で最速な方法を示したいと思います。
前回、前々回と触ってきた Compute Shader を使います。(以下の方法が具体的にイメージできない人は読み返してね)
Compute Shader を新規作成したら、次のコードを記述します。
// Each #kernel tells which function to compile; you can have many kernels
#pragma kernel CSMain

float n_f;
float f;
Texture2D<float> _zBuffer;
RWTexture2D<float> _cameraZ;

[numthreads(8,8,1)]
void CSMain (uint3 id : SV_DispatchThreadID)
{
#if SHADER_API_GLES3
	// for Android
	_cameraZ[id.xy] = 1.0f / (n_f * (1.0f - _zBuffer[id.xy]) + f);
#else
	// for Windows
	_cameraZ[id.xy] = 1.0f / (n_f * _zBuffer[id.xy] + f);
#endif
}
単なるシェーダーではなく Compute Shader であるため UNITY_REVERSED_Z による判定が行えません。
Android では UNITY_REVERSED_Z ではなかったので泣く泣く SHADER_API_GLES3 でコードを変更しています。
この Compute Shader を使うスクリプトは次の通り
using System.Collections;
using System.Collections.Generic;
using UnityEngine;

[RequireComponent(typeof(Camera))]
public class VirtualCameraBehaviour : MonoBehaviour {

    private int width;
    private int height;

    Camera _virtualCamera = null;

    RenderTexture _color = null;
    RenderTexture _zBuffer = null;

    public RenderTexture _cameraZ = null;

    public ComputeShader Depth;
    public GameObject uiResult0;
    public GameObject uiResult1;
    public GameObject uiResult2;

    void Start () {

        width = Screen.width / 2;
        height = Screen.height / 2;

        _virtualCamera = GetComponent<Camera>();

        _color = new RenderTexture(width, height, 0, RenderTextureFormat.ARGB32);
        _zBuffer = new RenderTexture(width, height, 32, RenderTextureFormat.Depth);

        _virtualCamera.SetTargetBuffers(_color.colorBuffer, _zBuffer.depthBuffer);

        _cameraZ = new RenderTexture(width, height, 0, RenderTextureFormat.RFloat);
        _cameraZ.enableRandomWrite = true;
        _cameraZ.Create();

        float n_inv = 1.0f / _virtualCamera.nearClipPlane;
        float f_inv = 1.0f / _virtualCamera.farClipPlane;
        Depth.SetFloat("n_f", n_inv - f_inv);
        Depth.SetFloat("f", f_inv);
        Depth.SetTexture(0, "_zBuffer", _zBuffer);
        Depth.SetTexture(0, "_cameraZ", _cameraZ);

        uiResult0.GetComponent<UnityEngine.UI.RawImage>().texture = _color;
        uiResult1.GetComponent<UnityEngine.UI.RawImage>().texture = _cameraZ;
        uiResult2.GetComponent<UnityEngine.UI.RawImage>().texture = _zBuffer;
    }

	void Update () {

	}

    private void OnPostRender()
    {
        Depth.Dispatch(0, _zBuffer.width / 8, _zBuffer.height / 8, 1);
    }
}
オフスクリーンレンダリングで、解像度を指定して VirtualCamera 画像を作り、そのカラー画像や深度画像を float 32bit 深度 1チャンネル画像として取得しています。
CPU 側で float 配列を手に入れたい場合は次の一工夫を加えて完了です。
// Each #kernel tells which function to compile; you can have many kernels
#pragma kernel CSMain

float n_f;
float f;
int width;
Texture2D<float> _zBuffer;
RWTexture2D<float> _cameraZ;

// for float Array
RWStructuredBuffer<float> _zArray;

[numthreads(8,8,1)]
void CSMain (uint3 id : SV_DispatchThreadID)
{
#if SHADER_API_GLES3 // insted of UNITY_REVERSED_Z
	// for Android
	_cameraZ[id.xy] = 1.0f / (n_f * (1.0f - _zBuffer[id.xy]) + f);
#else
	// for Windows
	_cameraZ[id.xy] = 1.0f / (n_f * _zBuffer[id.xy] + f);
#endif

	_zArray[id.x + id.y * width] = _cameraZ[id.xy];
}
以下の対応で CPU 側の float 配列に深度画像の画素値が得られることを確認しました。
これで OpenCV にこのデータを使ってもらうことにより、さまざまなモデルベース処理が行えるという夢が広がります。
using System.Collections;
using System.Collections.Generic;
using UnityEngine;

[RequireComponent(typeof(Camera))]
public class VirtualCameraBehaviour : MonoBehaviour {

    private int width;
    private int height;

    Camera _virtualCamera = null;

    RenderTexture _color = null;
    RenderTexture _zBuffer = null;

    public RenderTexture _cameraZ = null;

    public ComputeShader Depth;
    ComputeBuffer _zArray;
    float[] _zArrayData;

    public GameObject uiResult0;
    public GameObject uiResult1;
    public GameObject uiResult2;

    void Start () {

        width = Screen.width / 2;
        height = Screen.height / 2;

        _virtualCamera = GetComponent<Camera>();

        _color = new RenderTexture(width, height, 0, RenderTextureFormat.ARGB32);
        _zBuffer = new RenderTexture(width, height, 32, RenderTextureFormat.Depth);

        _virtualCamera.SetTargetBuffers(_color.colorBuffer, _zBuffer.depthBuffer);

        _cameraZ = new RenderTexture(width, height, 0, RenderTextureFormat.RFloat);
        _cameraZ.enableRandomWrite = true;
        _cameraZ.Create();

        float n_inv = 1.0f / _virtualCamera.nearClipPlane;
        float f_inv = 1.0f / _virtualCamera.farClipPlane;
        Depth.SetFloat("n_f", n_inv - f_inv);
        Depth.SetFloat("f", f_inv);
        Depth.SetTexture(0, "_zBuffer", _zBuffer);
        Depth.SetTexture(0, "_cameraZ", _cameraZ);

        _zArrayData = new float[width * height];
        _zArray = new ComputeBuffer(_zArrayData.Length, sizeof(float));
        Depth.SetBuffer(0, "_zArray", _zArray);
        Depth.SetInt("width", width);

        uiResult0.GetComponent<UnityEngine.UI.RawImage>().texture = _color;
        uiResult1.GetComponent<UnityEngine.UI.RawImage>().texture = _cameraZ;
        uiResult2.GetComponent<UnityEngine.UI.RawImage>().texture = _zBuffer;
    }

	void Update () {

	}

    private void OnPostRender()
    {
        Depth.Dispatch(0, _zBuffer.width / 8, _zBuffer.height / 8, 1);
        _zArray.GetData(_zArrayData);

        float av = 0;
        for (int i = 0; i < _zArrayData.Length; i++)
        {
            av += _zArrayData[i];
        }
        av /= _zArrayData.Length;
        Debug.Log("average z = " + av.ToString("0.0000"));
    }
}