前書き
Unity でゲーム作っている人なら多くの方が知っている VRM - VR向け3Dアバターファイルフォーマット -。
その VRM の標準シェーダーとして採用されている MToon を URP でも表示できるようにしたい!
作りましょう!
そのための情報集めから作業をこの記事で公開します。
そのあと、公開しました。
github.com
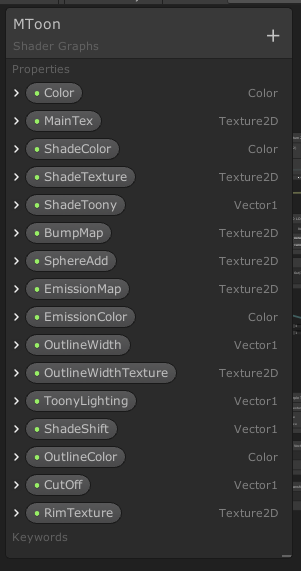
MToon のパラメータ一覧
新しく ShaderGraph - Unlit を作成して公開パラメータとして次のものを作成します。
光源情報を Custom Function ノードで取得
github.com
ここにあるサブグラフ一式と .hlsl シェーダー実装をコピーしておきます。いつでも使えるように
内容はほんと、単に光源情報取ってきているだけです。

Toon シェーディング for ShaderGraph
次の動画の説明欄にあるリンクから Toon 表現の肝となる Node を見つけてコピーします。
ほしいのはこの Node です。

アウトライン Shader
そして MToon で外せないのが Outline です。
Shader Graph で実現する方法が紹介されている記事がこちら
Normal が Alpha テストできない問題に最終的に当たるので、もろもろ削除して、結局 Depth を書き出すプロジェクトで次の CustomFunction を呼ぶだけにします。
最終的に Outline サブシェーダーを作りますが、そこに登場する Custom Function は三つ
下図のとおり、左上のオフセットが
Out = unity_StereoEyeIndex;
左下の係数が
Out = 1.0;
#if UNITY_SINGLE_PASS_STEREO
Out = 0.5;
#endif
右下の Custom Function がこちら
TEXTURE2D(_CameraDepthTexture);
SAMPLER(sampler_CameraDepthTexture);
float4 _CameraDepthTexture_TexelSize;


void OutlineObject_float(float2 UV, float OutlineThickness, float DepthSensitivity, float NormalsSensitivity, out float Out)
{
    float halfScaleFloor = floor(OutlineThickness * 0.5);
    float halfScaleCeil = ceil(OutlineThickness * 0.5);

    float2 uvSamples[4];
    float depthSamples[4];

    uvSamples[0] = UV - float2(_CameraDepthTexture_TexelSize.x, _CameraDepthTexture_TexelSize.y) * halfScaleFloor;
    uvSamples[1] = UV + float2(_CameraDepthTexture_TexelSize.x, _CameraDepthTexture_TexelSize.y) * halfScaleCeil;
    uvSamples[2] = UV + float2(_CameraDepthTexture_TexelSize.x * halfScaleCeil, -_CameraDepthTexture_TexelSize.y * halfScaleFloor);
    uvSamples[3] = UV + float2(-_CameraDepthTexture_TexelSize.x * halfScaleFloor, _CameraDepthTexture_TexelSize.y * halfScaleCeil);

    for(int i = 0; i < 4 ; i++)
    {
        depthSamples[i] = SAMPLE_TEXTURE2D(_CameraDepthTexture, sampler_CameraDepthTexture, uvSamples[i]).r;
    }

    // Depth
    float depthFiniteDifference0 = depthSamples[1] - depthSamples[0];
    float depthFiniteDifference1 = depthSamples[3] - depthSamples[2];
    float edgeDepth = sqrt(pow(depthFiniteDifference0, 2) + pow(depthFiniteDifference1, 2)) * 100;
    float depthThreshold = (1/DepthSensitivity) * depthSamples[0];
    Out = edgeDepth > depthThreshold ? 1 : 0;
}
あとはつなぐだけ
Toon 表現と Outline がそろっているので、接続して MToon の説明をたよりに編みます
MToon の心臓となる処理は Main と Shade のテクスチャを陰影で利用すること。
なので、Toon 表現で白黒を出力して、それを Lerp する処理が書けたらほぼ完成。自分はさらにライト色をもらうように Multiplyしてます。


